
Testing, testing, one, two, three
This is Penelope the pig. She's an American Guinea Hog.
OJ
Testing, testing, one, two, three
This is Penelope the pig. She's an American Guinea Hog.

OJ


Whether or not you want to use the sinew, this is a great way to remove it from the back strap meat. We'll be moving soon! I'm working on the new website now!
https://www.youtube.com/watch?v=Texv12eY0c4
I slaughtered a goat a couple of days ago for meat and used the opportunity to make this video on proper skinning. I've skinned hundreds of animals to develop this simple strategy, which works well for me. It could be streamlined by anyone with enough practice and experience, but I think the approach is pretty solid. Yes, some of you aren't as big or strong as I am and may think this method is not possible for you. It may take quite a bit longer and you may have to do a little more cutting, but don't give up too easy! You may have to use the knife a little more, but use it only where you really actually have to and do your best to muscle and technique your way through the rest of it. Get all up in that carcass and use your bodyweight, and you may be surprised at what you can do! No need to be a purist. If you have to use a knife, then so be it, but it seriously takes FOREVER to skin an animal carefully with a knife and you will still slip up and cut the skin sometimes. Countless hides are ruined every day due to poor skinning which is by far and away the norm, even when people are well intentioned. Share this video with those hunters and animal raisers you know to help change that! Hides are a valuable resource and tanning is an accessible skill for homesteaders and small farmers. I'm still working on that tanning book, which is going to make it more accessible than it has every been, but this goat was a bit of a distraction among others. It's almost processed and put away now, just have to render the fat and salt the skin (which may also be videos) and wrap some stuff for the freezer, then I won't have to worry about meat... at least until buck season opens in a couple of weeks.
This approach is somewhat applicable to lambs and sheep as well, and some parts to skinning almost any animal.
https://www.youtube.com/watch?v=J-oWBdxxMfA
Here are a couple of recent videos I did on the stuff I do around here. One is a short update on labeling and protecting fruit that was pollinated earlier this year as part of my apple breeding project. I talk a little about the breeding parents and related stuff, but it's pretty straightforward and short, with a quick visit to my new pig. The second is a follow along while I cut down, cut up, and peel the bark off of a tan oak tree that is infected with the organism involved in sudden oak death. I use the bark for tanning skins. I'm working on a book right now on tanning with plant materials like bark, various leaves and pods and stuff like that. Writing, research and experiments around that project now consume most ofmy time, energy and thought. In the video I show a few pieces of leather tanned with oak bark, peel the bark, split the wood and clean it all up. There are few things I'd rather do with my time than that type of forestry work. Splitting wood, playing with wood, using my axe, burning brush to make charcoal, etc.. is all my idea of a good time! woo hoo! It's really hard for me to cut these videos down and focus them in. There are so many satellite topics I want to talk about! Definitely some stuff coming on axe use, wood splitting tutorials, forestry and forest ecology, and lots of tanning and skin working stuff.
https://www.youtube.com/watch?v=vNFZiu4mSts
https://www.youtube.com/watch?v=KX8g0Yt0ZmI
https://www.youtube.com/watch?v=rV0EqNy7bw8
Here is my review of two crabs that fruited here on Frankentree for the first time ever. Centennial and trailman are very similar and seem to ripen at the same time. Both have good flavor and very good to excellent texture, even after a recent heat wave with consecutive days over 100 degrees, 101, 103, 103 in the shade.
I have a particular interest in crab apples that are edible out of hand, with good dessert quality and these two really fit that description. They are not only very good to excellent in eating quality, but they are also the second apples to ripen here, this year in the first two weeks of July. "First early" apples are usually low in sugar, grainy or mealy and just not that great for eating. Time will tell more, but I can already tell from just a few samples that these apples are a great find. I'll probably be breeding with these in the future as I think excellent dessert crabs are something that needs work and has great potential. These are super easy to eat, since you can eat the entire fruit with the core, seeds and all. The seeds only add to the flavor, like an almond flavor filled center.
A walk around looking at various parts of my apple breeding project. It doesn't look like much, but I think it's getting the job done. I spotted my first blossom while filming this. Way cool, that means I'll probably have some bloom next year, hopefully followed by fruit!
https://www.youtube.com/watch?v=X8EdnuyClkk
Why I stopped selling at the local Farmer's Market, due to red tape, health and new rule changes.
https://www.youtube.com/watch?v=ZZqScKgvX0Q
Here is a quick tour of my garden this early summer (not super quick, but my version of quick relative to the hours I could have spent). It is not what I’d like it to be, but it’s pretty tidy and growing well, much better actually than the last two years. We are in year two of a pretty bad drought, but I think the ever flowing spring is going to trickle on through this one too. So, I am undaunted. Of course many of the things touched on in these videos will be revisited in future videos and blog posts.

I'm shooting a video series on making high grade hide glue. At least that is the goal, we'll see when I test the glue after it's finished, or maybe have it tested by someone else. The third video, on liming, is uploading to YouTube as I'm typing this. The approach is a sort of learn as you follow along kind of thing, going through the process of turning a cattle hide from Tamara's recent cattle processing class into hide glue. Every time I go to work on the skin, I take some video and edit it down. One section is sort of a lecture type deal with some chalkboard action, one is on fleshing and, aside from the liming one uploading now, the others will be de-hairing and de-liming, cooking and pouring, then finally cutting and drying. Maybe at some point there will be one on testing the finished glue.
This hide glue series will be fairly long, but there are things in there to learn beyond making hide glue. Little snippets about other stuff relating to tanning skins and such inevitably work their way in. No process is an island after all. So far these videos have been decidedly lacking in popularity and the total number of people that really get a lot out of this will probably not be that many. But it will be there when people are ready for it, and that is most of the reason I do this stuff at this point, as a reference archive and so it doesn't all die with me one day. Personally, I think it's really cool, even though I've so far mostly restrained myself from going on long tangents about multiple related processes and ideas. Poking around looking at other hide glue videos on youtube, a lot (or most?) of them use rawhide chew toys cut up in pieces. Nothing wrong with that in context I suppose, but that has never been what we, or the genesis of Paleotechnics, has ever been about. I'm definitely bringing you something closer to the ground up version.
The link below goes to the main Playlist into which all videos in the series will be placed as they come out. I think anyone with any kind of google account, like Gmail, can subscribe for updates. My channel, for now, is a mixed bag of stuff I get up to. I'm also currently also doing a series on amateur apple breeding, which will follow my progress over the years attempting to breed up some new red fleshed apples here at the Turkeysong experimental homestead. For the hide glue series, I'm in the dehairing/refleshing/deliming process now, so that one should be up soon. When finished, I will probably sell the glue on Etsy. If that works, maybe I'll add artisan hide glue making to my list of little income sources. Artisanal hide glue for artisanal artisans, you know instrument makers, fine artists who use traditional materials, fine woodworkers that want their furniture to be fully repairable in the future and the likes of them. People who are keepin' it real! See ya...


Yay! The apple breeding video series is off the ground! I really wanted to get it launched this year because I made a lot of pollinations this time around, and I'm not sure how many more years I'll be doing it.
The first two videos are published . They are basically the same video in two parts, of me talking about why I'm breeding apples and basically why I think more people should breed plants, apple breeding history, along with some gentle ranting (only had to bleep out one %$#*& word! Pat me on the head). The next videos will be thoughts on selecting parents and then onto the fun part, the first how to segment which is on pollination. The pollination segment is mostly done, and I think it really turned out beautifully with my new drastically improved video capabilities.
The concept of this series is to follow the entire breeding process starting from pollination, for many years onward, until those specific crosses bear fruit, and likely beyond that as the fruit is assessed over a number of years to see if it is worth naming and propagating. Also, we'll be following my progress with the whole project which is around 4 years in right now. I made my first pollinations in spring 2011, so I may get lucky and have some fruit as early as next year. One of my first seedlings is actually fruiting now, but it is just an open pollinated seedling of Wickson from my friends at The Apple Farm near here, so the pollen parent of that one is unknown.
My main goal with this video series to is to continue to incite creativity and deeper participation in what we are growing and eating, so please share so I can corrupt more people! mwaahhhahahahhhaaa...

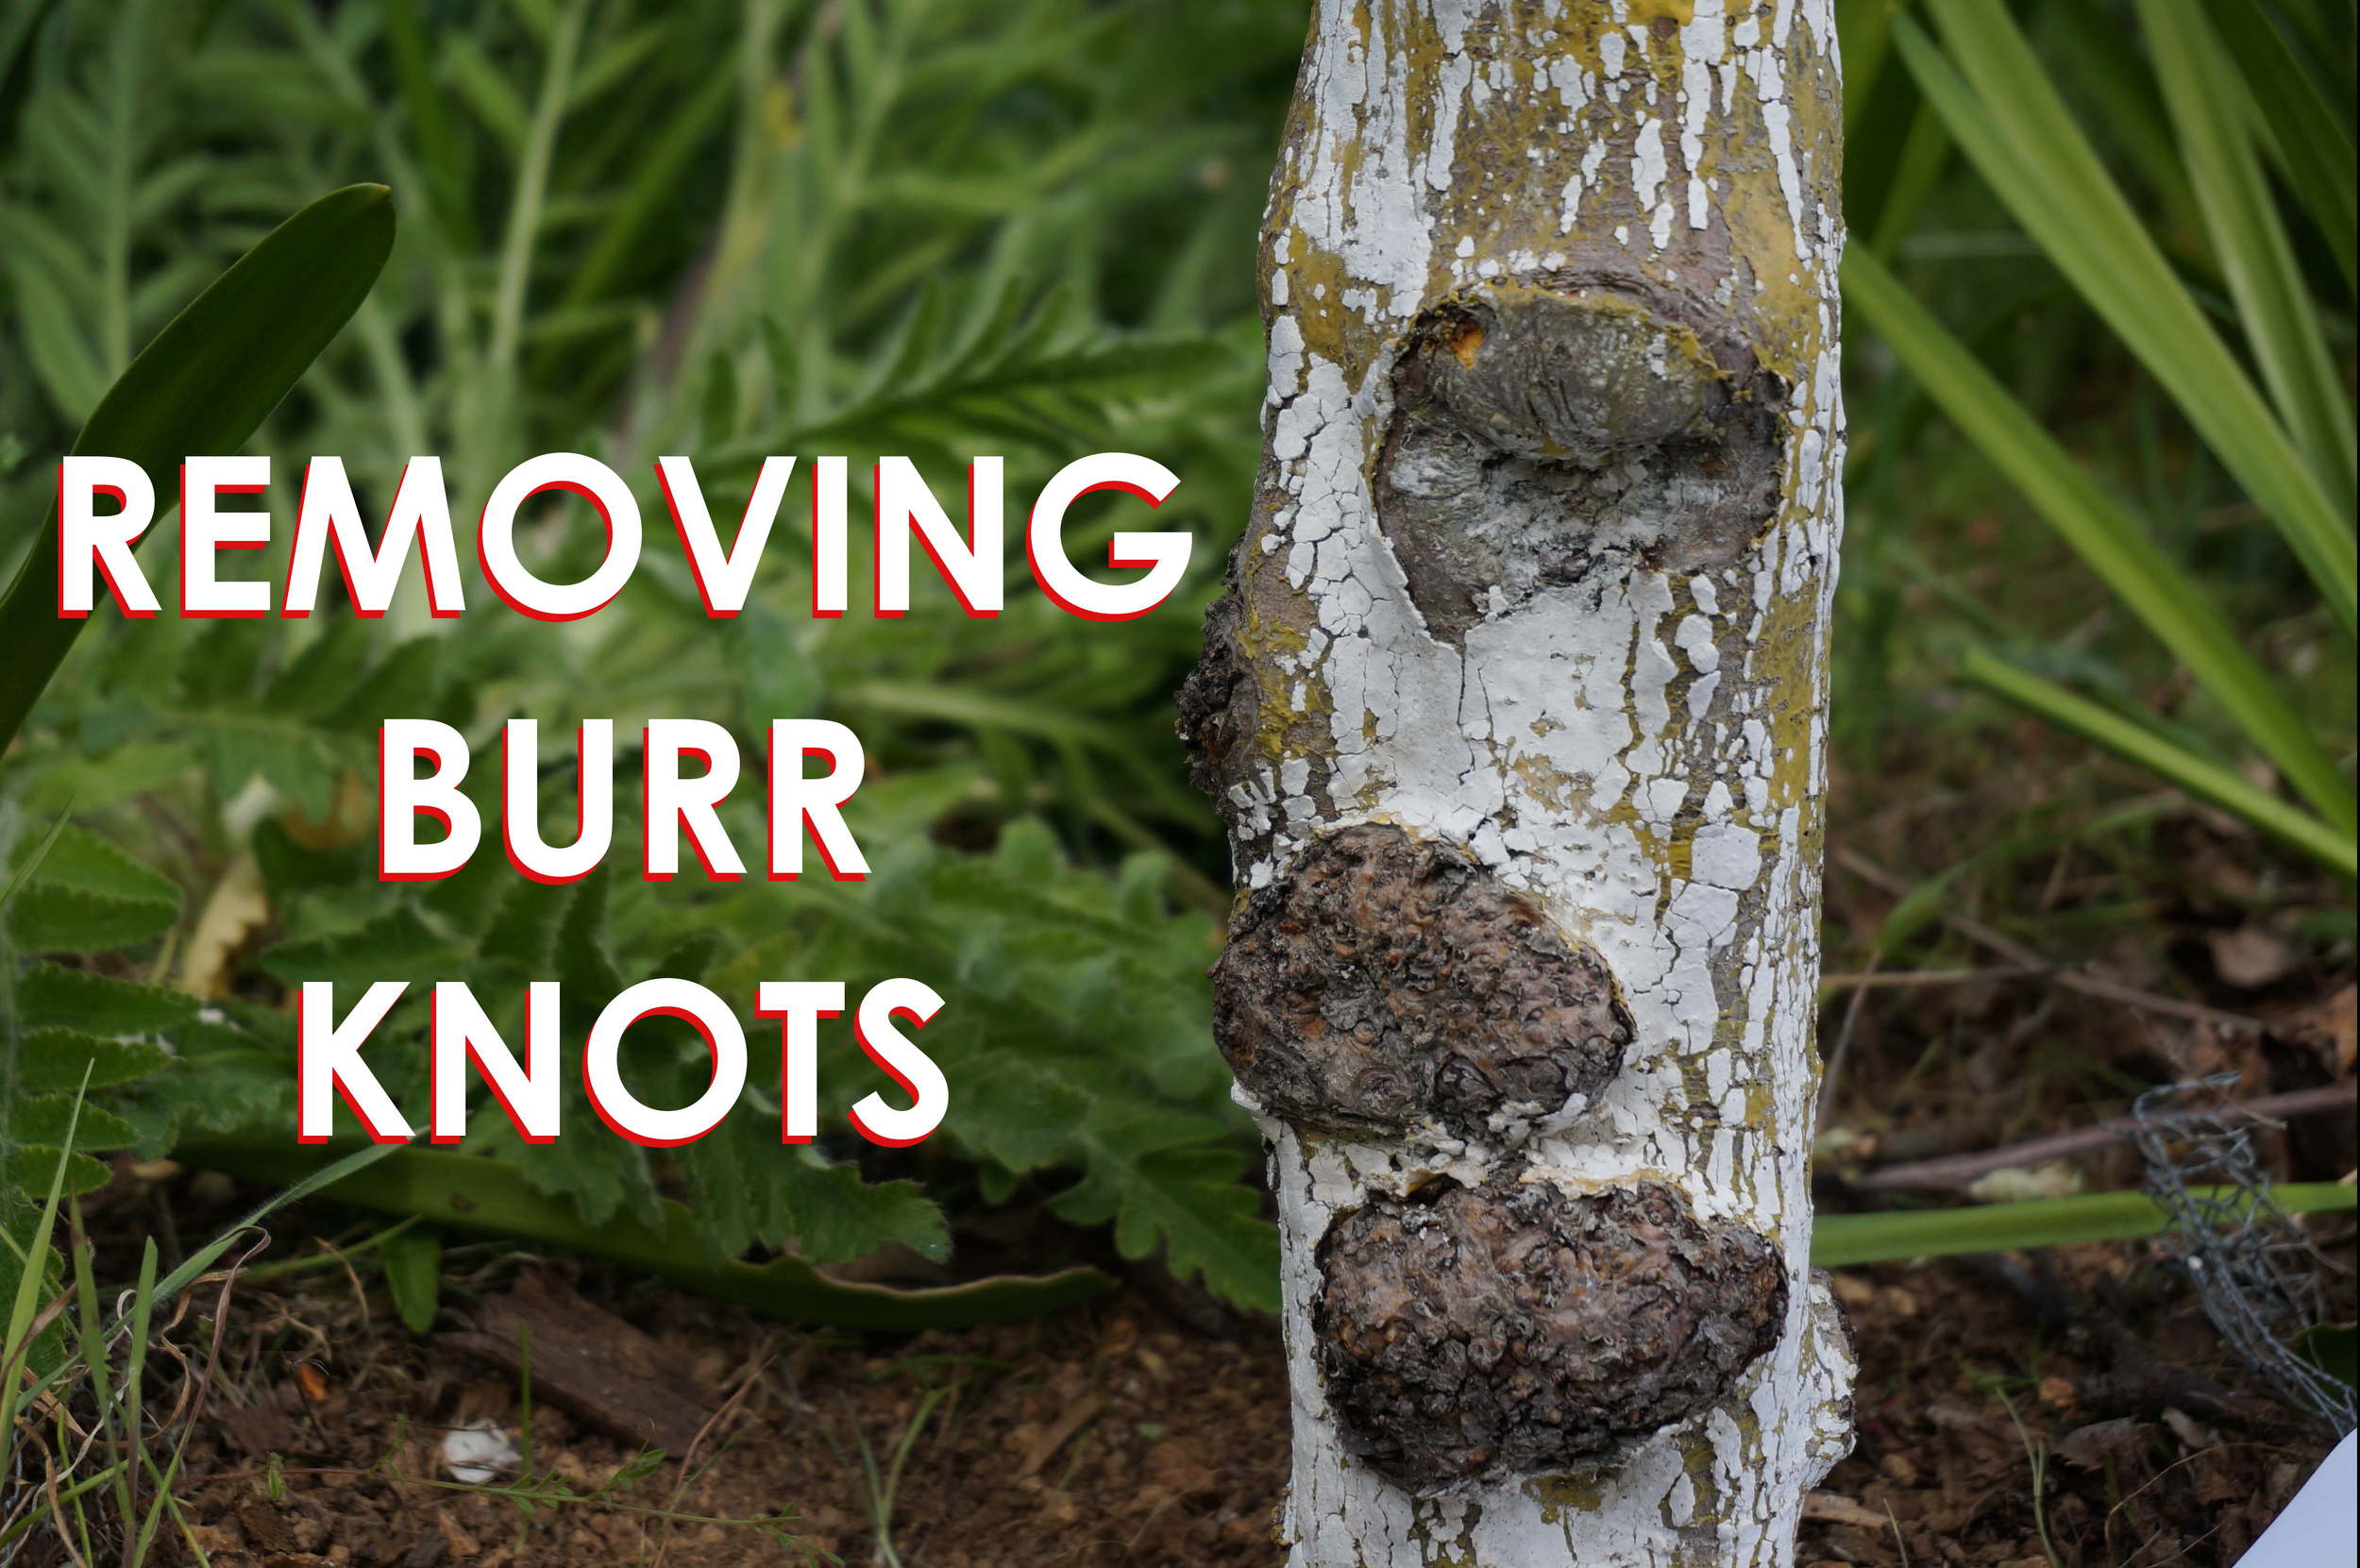
'Tis the season to do tree surgery- at the beginning of the growing season and after most of the rain. A short video here on my experience so far with removing burr knots (arial root balls) from apple trees and how/why I think it works. When I looked for information before trying this a few years ago I found almost nothing. I think there was literally one dude in the internet universe who was like "yeah, you can cut those off" (I'm totally paraphrasing). So, hopefully this will help a few people with those unsightly and, lets face it, unsafe burr knots. It looks pretty dope too, because I finally got a new camera! Now I have the potential shoot killer HD video with any lens that will fit on the camera, which is almost any lens actually. I'm still climbing a steep learning curve with audio, camera functions and all the details, like remembering what the hell it was I was going to say, but I think things are improving pretty fast. BTW, look up your root stocks to see if they are prone to Burr Knots and if so, plant them up to the graft union. Nobody told me that back in the day, but then again if they had, I wouldn't have got to make this video and dork out on burr knot theory.
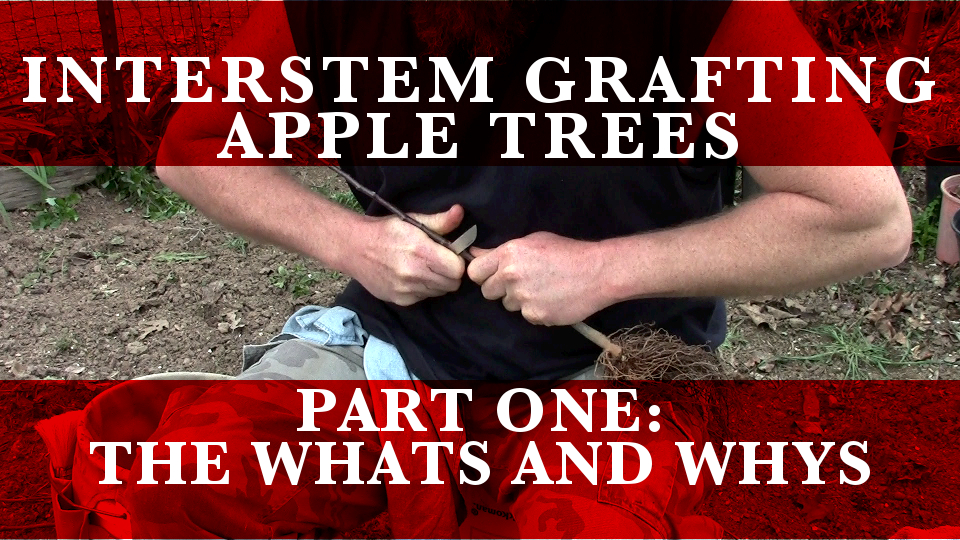
I just posted up a series of videos on interstem grafting. This is most of what I know about interstem grafting Apple trees, growing them out, and their advantages and disadvantages. Maybe a little late for this grafting season, but it's never too early to start planning for next year!
A couple of videos and a little news on apples and flowers! It's grafting season. A lot of people have probably already finished their scion trading, but here is my take on storing and shipping scions. I was so caught up in the details that I kind of forgot the basics, like store them in the refrigerator. If it were more comprehensive, it would also include storing the scions without refrigeration, which maybe I'll do later, but same basic concepts apply. Mostly, I was trying to address the potential of excess water and the use of paper to cause problems.
https://www.youtube.com/watch?v=Bx5UwS3SmlU
And for those of you who are lucky enough to have black trumpet mushrooms in your neck of the woods, this video is on how I clean them really fast, and dry them. It also includes a (what in my opinion is an all too short) rant on efficiency and work as a symbolic activity. It is a long video for how to do something really fast, but I think the stuff about intention and mental attitude is just as important as the physical part, and it will save your a lot of time in the long run if cleaning large quantities.
https://www.youtube.com/watch?v=6iezTiOBXDc
DOOOOODS!!! Two flowers from the first batch of Daffodil Seedlings grown from seeds pollinated in 2011 have put forth flower buds! The bulbs arestill rather small, so I wouldn't be surprised if they are under-developed, but that's still pretty exciting, especially considering that I haven't taken stellar care of them. I figured I was at least another year off from seeing anything. I seem to pick breeding projects that take a long time. Daffodils typically take about 4 years or more, and apples 5 or more years. They should open within the week, at which point I may have to update the Daffodil Lust series with a new post. Even more exciting, one of the seedlings is from Young Love, the daffodil that inspired it all!

I just recieved 50 apple rootstocks in the mail for grafting up my latest round of red fleshed apple seedlings, and last year's pollinations are sprouting up in the greenhouse. Good news, I just talked to my friend Freddy Menge, who is sort of my apple guru or early inspiration. We talk about apples on the phone about every other year. He's getting results from his apple seedling trials, which I believe are mostly open pollinated, but he has a good collection of quality hand selected varieties growing, not just some random stuff. He say that he gets more apples that are worth eating than ones that aren't. That's just what I suspected when I started my breeding project and what Albert Etter seemed to be saying. It also is totally at odds with what passes for common "knowledge". He has sent me two of his seedlings that I'm trying out, one I've been calling King Wickson (not sure if he has a name for it) which he thinks is a King David x Wickson cross. The other selection is Crabby Lady a small, more intensely flavored version of the latest ripening apple here, Lady Williams, also thought to be crossed with Wickson crab. Crabby Lady ripens at the same time as Lady Williams, and sounds like a real improvement on an already very good and super late apple, so that really got my attention. I'm hoping King Wickson will fruit this year, but I just grafted Crabby Lady this past week.
Freddy also said that about 1/4 to 1/3rd of his red fleshed apple seedlings have red flesh. I was hoping for a little higher percentage than that, but such is life. I may do some crosses between red fleshed apples this year to try to reinforce the red fleshed trait. Another amateur plant breeder just contacted me through the blog who is also gearing up to do some red fleshed apple breeding. Yay for grass roots apple breeding for the masses!
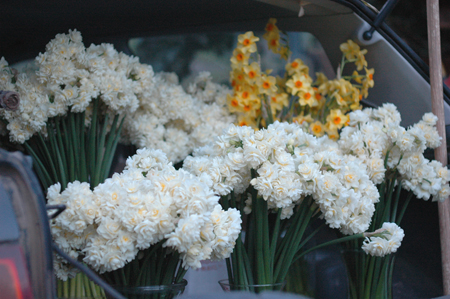
I'm off to get ready for the farmer's market in the morning. Not much in the way of vegetables to sell anymore, but I cleaned up selling Erlicheer narcissus flowers on Valentines day and have a new batch ready to go. It's nice to have that plan working out. The Erlicheer are planted along both sides of a row of oblique cordon apple trees, so they require no extra care other than what I already do in taking care of the apples. By the time the apples are leafing out, the flowers are thinking about going to sleep, so they have nearly opposite seasons
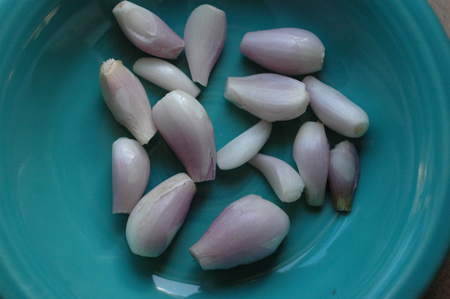
I’itoi (pronounced E-E-toy) are small and prolific multiplying onions. The story goes that they were acquired from the O’odham people in what is now Arizona and N. Mexico. They produce a very small Shallot like bulb that can be peeled and eaten, or they can be used as greens or pulled off during the growing season for “scallions”. They are very rare at this point and were put on the Slow Food movements Ark of Taste a list of endangered food varieties. I tossed a bag of old dried up ones that I thought were probably dead out in the rain a month ago, and a lot of them sprouted, so I thought I’d pass on what is left to readers of this blog rather than tossing them in the compost. These are the ones that were too shrunken to sell, though perfectly viable, and now they are just barely hanging on for dear life. They have a small core of viable bulb left and I think that if they are potted up soon most will still grow out. You really only need one as they are very good multipliers. I made up small packets of about 8 bulbs and tossed in a small sample seed pocket/packet of bulgarian giant leek seeds in each. There are about a dozen packets ready to ship, first come first serve if you pay shipping, which just $1.50 should cover. You can paypal that to me after contacting me through the contact link on this website. This is offered for people who are subscribed to my blog.

I don’t know much about cold hardiness of I’itoi. They certainly do fine with light freezes, but growing them outside in really cold climates is going to be a bit of an experiment. I'd appreciate any reports back on how they do. These bulbs are barely hanging in there, but they are tough little guys and still have a living core waiting to find some soil and water. Plant them immediately. In warm climates, plant in the ground now. In cold climates, I’d start them in a pot indoors and then plant out when warm weather arrives. They reproduce like crazy and even if only one survives, you’ll have plenty to share, replant and eat soon enough. I started with just a few and have sold and given away many hundreds of bulbs.
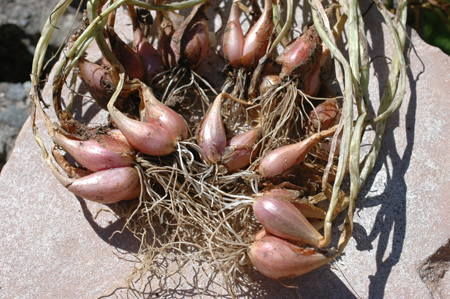
If left in the ground, they’ll form a dense cluster that can contain hundreds of small bulbs. If replanted singly and well tended, they will form much larger bulbs than if left alone, but again they are still quite small.
First come first serve. Contact me through the contact link on this page. Again, this is for people who are subscribed to my blog and they'll probably go fast, so don't contact me next week or next month or next year. I'll probably have them on ebay again this summer and I would think that they will be more widely available from seed suppliers soon.

A google search will turn up a little info on I'itoi onions, but there is only so much out there. This link is a good page to check out for more info.
And This video
https://www.youtube.com/watch?v=Uo6n9704vcE
The short version of this year: Felt like crap most of the year, didn't get a lot done, stopped growing stuff intentionaly for the farmer's market due to unreliable health and too many wasted crops, switched most of my energy and time over to trying to figure out health issues which occupies about 2 to 4 hours or more of research on most days and much of my thoughts. But, even though I sat on my ass for about 80% or more of the great majority of my days, the pictures I took this year do show that I did get out a little bit. I'm in a full on war to regain my health. It takes a lot of thought and time, so I haven't done as much cool stuff as usual. Once I figure that out, I hope to be a fountain of useful output, but until then I'm running on fumes. This year, I was really just getting by most of the time with little spurts of energy here and there which I generally use to do something interesting so I don't go completely crazy, often with piles of dishes and laundry as a result. Give me a choice between a pile of dirty laundry with a pile of charcoal and, well... I'll just be adding some charcoal stained clothes to that dirty laundry pile son! Let me tell you, a life of leisure is just not for me!
The spring ran on through the worst drought anyone can remember. It was pretty slow, but there was still more water than I ended up using. The spring really does make it all possible. I feel like I should build a shrine or something. Seriously amazing.
I actually got around to filling my deer tag this year! Skippy the deer is mostly eaten up now, and good riddance. He was busting down fences, messing up fruit trees and generally being a juvenile delinquent. I was half expecting to find graffiti somewhere... DEERZ RULEZ! on the water tank or something. The plan was to do a year long educational video series following the processing of Skippy into all kinds of cool stuff, but it proved too large of a challenge to pull off on my own and just getting him cleaned and in the freezer was enough at the time. Maybe next year.
My ex partner and currently business and land partner Tamara Wilder has been back more this winter bringing some help in the form of work traders and such. It's a bit of a challenge to have people here after living in solitude for a year and a half or more and I'm generally not up for managing anyone, but maybe some stuff will get done.
I've been a little more focused this year on video and hope to continue that trend. I still want a better camera, but I have an okay consumer camcorder I can use for now. I am pretty excited about the great potential of video and the opportunity to reach a lot of people around the world with it. You can visit my fledgling youtube channel here. It's always helpful to get comments, likes and subscriptions, hint hint! So this year it's two for one, The Year in Video and The Year in Pictures. Or more like two for none, what a deal!
I'll let the images and captions tell the rest.
Watch in HD if your rural connection is fast enough.
https://www.youtube.com/watch?v=k6Vfg3EHQMk
_______________________________________________________________________

Edward's Winter apple re-grafted to a better (better here anyway) variety by frameworking. Frameworking is generally superior to topworking, a more usual method, and I will be pushing this idea more in the future. The Amaryllis flower bulbs growing beneath the tree are part of my tree understory experiments.

The same tree in August, harvesting amaryllis flowers for sale at the farmer's market. You can see the growth is pretty good on the new grafts. It almost just looks like a normal tree. The few fruits are from a few remaining branches of the old variety.

More fruit tree understory experiments with amaryllis belladona. This tree literally had only 2 or 3 weeds under it this year. (edit, the following year it had 3 weeds, so the weed suppression part is definitely working!)

The same tree as above in the summer time showing dense mat of dead leaves protecting the soil.

My neighbors hired me to turn this apple into a frankentree for them. I think we put on about 30 varieties, all tested by me for this area. It was dubbed !Bride of frankentree!
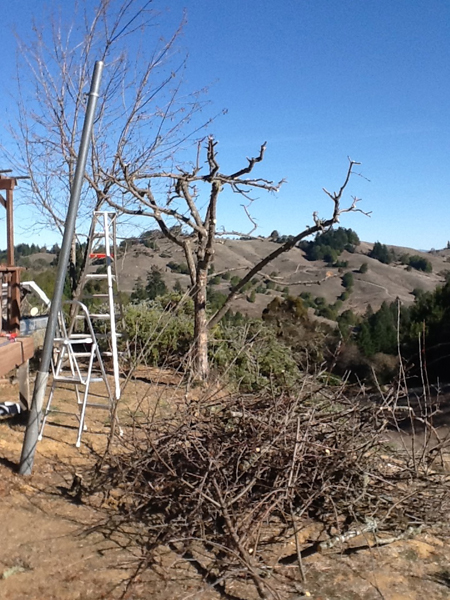
The tree prepared and ready to graft. One section on the left was retained as the original variety.

All the grafts finished and labeled

Some regrowth


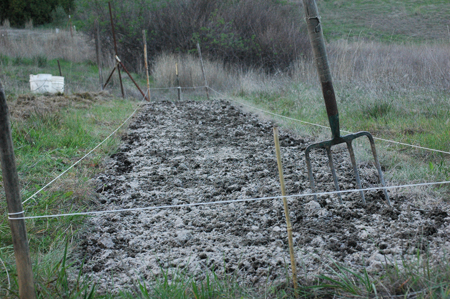
Newly dug bed for trialing red fleshed apple seedlings. The white color is from ashes and oyster shell.

Beautiful healthy apple seedling from my red fleshed apple breeding experiments headed for the trial rows.


this was a tree planting site on which I did a charcoal burn. I dug a large pit, burned the charcoal in the pit, crushed it and re-buried it in the pit as it was refilled.
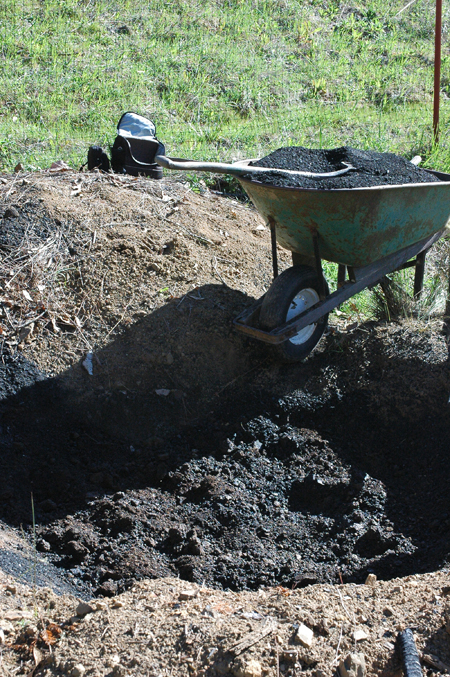
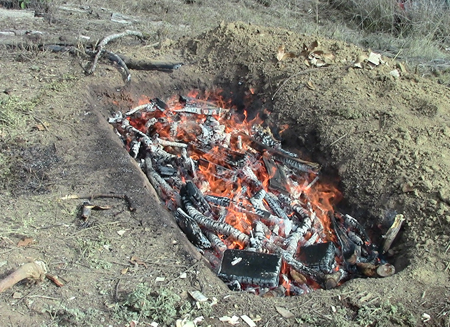
More trench burning of charcoal from the youtube video I posted on the method. I'm stoked about it. It seems to work very well, and it's fun.
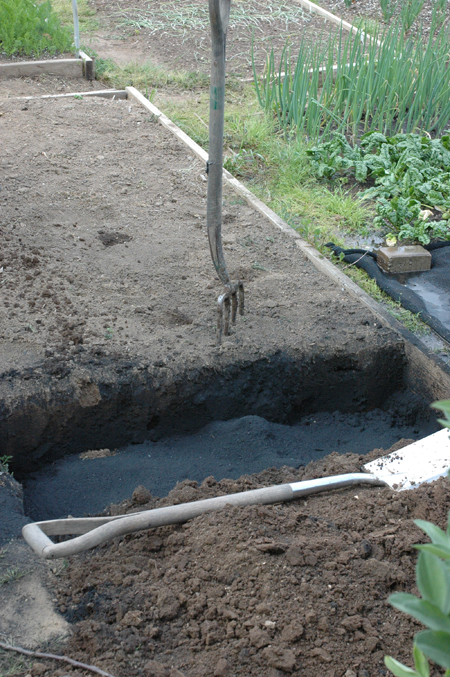
Digging biochar into a bed. This bed performed very well compared to most of the rest of the garden. In fact, my other biochar amended bed and this one were the best performing beds. This one was done as an experiment. Half is 10% charcoal to 20 inches deep and the other half is 20%, but only dug in 10 inches. In otherwords, same amount of charcoal in each end of the bed just mixed shallower or deeper. No observable differences so far. I have quite a bit of charcoal stockpiled and hope to get a couple more beds prepared this spring. I'm planning more char to greater depth on the next bed and it will be prepared all at once by digging everything out to at least two feet and re-assembling it in layers. That may seem like a lot of work, but given that it should result in a permanent improvement it doesn't seem so bad. Especially given the large amounts of organic matter that people dig into their beds yearly and which disappears yearly. Not that charcoal is a total replacement for organic matter, but it does have some important functional similarities and will probably ultimately either reduce needed inputs, or result in better use of them.

One year of growth on an apple tree after dis-budding and notching to select branches. This method appears so superior to what is commonly recommended that I am anxious to do an article or video on it. It may be a little hard to visualize in 3 dimensions from a 2 dimensional picture, but this tree gave me 4 branches in four different directions in just one year. I haven't taken a current picture, but the tree will be grafted over since the scion wood was mislabeled. It was supposed to be Golden Harvey, a super sweet long keeping cider/eating apple that I was all stoked up to find. It turned out to be some bitter foamy cider apple of no account.


Some stuff I think is cool this year:
Gokhale method of posture. This is different that any other kind of exercise, stretching, yoga etc... It is based on the idea that there is a basic correct type of posture for humans (which is probably a little different than what you've been told), and it really more to do with how you sit, lie, walk, live and move your body than exercises, though there are exercises. It also requires an attitude adjustment. Everyone I've turned on to it has been very enthusiastic and it has helped me a lot. This is really for almost everyone, but certainly people with any kind of posture/pain/joint issues should check it out. Classes aren't cheap, but the book is excellent and a great place to start.
Ray Peat. Ray peat might best be described as a renegade biologist and science historian. He has his mind in all kinds of things, but with a focus on nutrition and hormones, with metabolism being at the center of the picture. Peat is one smart cookie and possesses a vast store of knowledge that he can pull out on demand. It he always right? I doubt it, and I'm very unsure you should eat like him, but prepare to have a lot of things you assume to be given truths called into serious question by someone with a rare mind that thinks way outside the box. Try on for size: CO2 is much more than a waste gas of metabolism and you should make and retain as much as possible, serotonin and estrogen are primarily destructive substances in the body and there is no such thing as estrogen deficiency, and essential fatty acids are not only not essential, but essentially toxic and more of an unfortunate natural occurrence that we have to adapt to. Often includes the history of where science/medicine went wrong in adopting a certain dogma, and the influence of industry in corrupting scientific research and medical practice. This is not light reading and listening, but he dumbs it down for us as much as possible. Warning, Ray Peat can be a deep rabbit hole and lead to food neurosis and extreme self experimentation in a certain type of personality.
Michael Mews. This stuff is absolutely fascinating. There are several dominant theories on the prevalence of modern facial malformation and poor dental development, which has become nearly universal these days. How many kids do you know that are not getting braces around age 13? I can't think of any. The genetic explanation is pretty much bullshit, but convenient to point to for medical professionals who don't know the answer. Michael Mew's point of view deals with oral habits and environment. The third common view is diet via Weston Price, which probably has considerable substance, but is clearly not the total answer. Michael Mews is really putting out some amazing stuff about an issue that now affects nearly all modern people. If you have kids under 18, this is a must watch before subjecting them to the mutilation and idiocy that is standard practice orthodontics. It's also just plain interesting.
See you around homies! Have a great and productive year!
This is an introductory video I threw together to stoke people up on the idea of multigrafted trees. Quite a few fruit collectors use this technique and, while Frankentree is a more extreme example, I increasingly think that multigrafted trees with 3 to 30 varieties or so will serve the average person with a few trees much better than single variety trees do. Add to that the edifying character of the work, the increased involvement in one's own food supply and the neato factor and it seems like a pretty easy sell, except for the intimidation factor. I'd like to maybe think this out better and make a more refined version as well as a detailed video tutorial on some of the specific strategies and skills, but this will have to do for now. The original Frankentree post has a little bit of information on grafting with pictures of a couple of different grafts.
!FRANKENTREE! TRAILER...
!FRANKENTREE!
https://www.youtube.com/watch?v=WKE6t08wlBA
Coming next weekend! I guarantee the actual video is less exciting than the trailer, but it is much more edifying! This video will just be an introduction to the idea, and the benefits of frankentreeing. I will certainly put together a much more technical video in the future.
https://www.youtube.com/watch?v=FoVp4eMrYXo
Below is my second fast motion video on the two simple biochar methods I've been experimenting with. A few notes...
Fuels: I suspect that pieces larger than about 3 inches are better either split down or charred by another method, and chips might be better done in a TLUD or some such device. I haven't tried either in the trench though, so that's just speculation. I doubt that large wood will char well in the trench because it takes so long to char all the way through, but chips might be just fine if fed pretty constantly in thin layers. As long as everything you're putting in turns to charcoal and you're not getting a lot of ashes or a lot of smoke with it, you're doing well. I've done green and dry wood. Dry is better of course. I think the jury is still out on green wood. The one I did mostly with pretty green wood was a very hot, large pit and the wood was brushy allowing for the ingress for large amounts of air. It was still pretty sluggish and I'd certainly tend to let the stuff dry for a summer first if possible.
Wood size and shape: It's hard to say without actually measuring things, but the trench seems to have a very efficient conversion ratio (wood to charcoal with low ash production) if the material is of a nature that it can be laid thickly and flat onto the coals, and of course if it is tended adequately. This method takes a little more effort than last week's open burn, since you have to dig a hole, but it handles certain materials better. I've done a number of these now and have found that they don't handle tangly brush all that well. I did pretty good with douglas fir limbs, but not with oak, madrone and similar branches that have a lot of twigs poking in every direction. The fir limbs are pretty linear and stack into the trench closely enough to get by. If the fuel doesn't lay into the trench well, it will allow too much oxygen to reach the coals and result in more ash formation. So, really tangly stuff that takes up a lot of volume of space might be better burned in an open pile, or reduced in size and shape to fit into the trench better. When I take trees down, I typically limb up the 2 1/2" to 3" branches and larger, setting them aside, while anything smaller is brush for burning. So, I'll usually end up with a pile of each, larger stuff with little to no brush for the firewood pile or the trench, and small tangly stuff for the open pile method.

Trench v.s. Pit Shape: You could just dig a round pit, and that might be good for small wood, and especially small chunks like lumber cutoffs, but the long shape allows burning of long wood without cutting it up which can be a huge savings if long wood is what you've got. It of course works fine for short wood too. I haven't done a burn in just one end of the trench, but it seems like it should work fine as long as the open end of the fire has wood added to it same as the top. If nothing else, the trench could be blocked with dirt of bricks for small burns of short stuff.
Other options: FYI, this is based on the Japanese Cone Kiln concept, and you can also do it in other containers, like a webber BBQ for micro scale (be sure to seal any holes on the bottom). I think you could also use an old wheel barrow body. You can see Backyard Biochar for more on the cone kilns and other simple methods.
The burn requires maintenance, but not constant maintenance, so bring a book or a project to work on.
Summarizing:Between this and the open burn pile method in last week's video, a lot of wood types that most people have access to can be charred easily, with a minimum of preparations, planning or technology. Considering the simplicity and low inputs of these two methods, there seems little reason not to turn the woody resources that accumulate around a homestead, or even backyard, into charcoal instead of ash. That is my main message here. You could of course turn smaller stuff into compost, but since charcoal can serve some of the purposes of organic matter in the soil (nutrient reservoir, microbe housing, moisture holding and soil texture changes) but permanently with a one time applications, it's worth considering charring it in your webber for a while, or some of it at least. It's not a complete substitute for organic matter, but it should, in theory, help you get more out of the organic matter and other nutrients you add to the soil in the future. I add some organic matter to the soil, but I consider the most important the plant roots that are left behind after every crop.
Anyway, that's more than enough said. Most of what you need to know is in the video...
https://www.youtube.com/watch?v=I1jAo7qd_Q8
Yay, burn season is here! Just uploaded a few videos. A couple of short grape variety reviews, The pretty darn good Glenora and the excellent Reliance (of which I'm eating some right now, and they're super tasty!). And a somewhat long winded, but cool, video of burning a top lit open burn brush pile to make biochar (Which Kelpie of Backyardbiochar calls TLOB). This is one of the two charring methods I've been messing with, the slope sided pit (or container), and the open top lit piles. I think each has it's merits, but probably more importantly, each might be better suited to certain materials that people commonly have. Both can be scaled up and down in size and neither should produce a ton of smoke if the wood isn't either soaking wet or green. A pit burn video should be forthcoming. Hopefully I'll get better at shooting and editing video, learn to talk faster and develop a video personality at some point. In the meantime, pop some popcorn and check it out. No Guinea Pigs were harmed during the making of these videos, although some chickens were verbally assaulted.
https://www.youtube.com/watch?v=HVs75-A7PEo
https://www.youtube.com/watch?v=pOZ1XNtNRf4
https://www.youtube.com/watch?v=rARhQV7wmwI
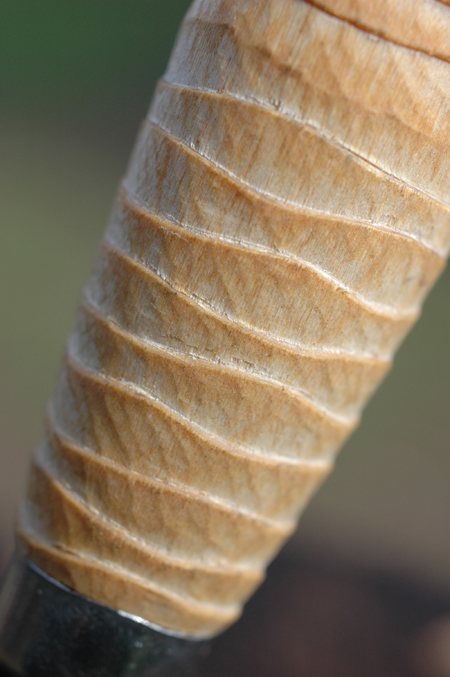
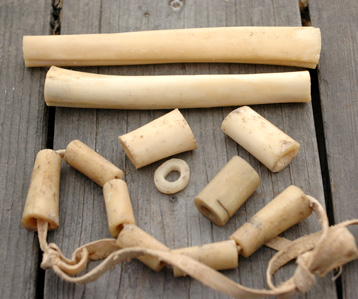
bone seasoning header

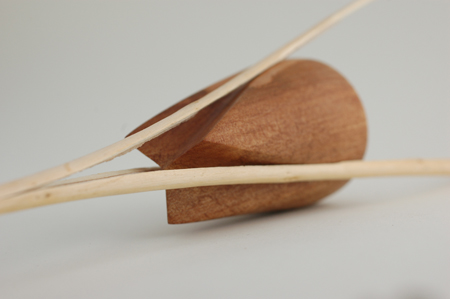
Typical cracking along the grain of the bone. Bone, like wood, has a grain direction.
Bone is a beautiful and useful material, but if you pick up any random bone from the yard, or one that has been buried, it may very well be cracked. That is because bones contain quite a bit of water and, like wood, when drying bone is subjected to stresses caused by shrinkage. Something has to give if the stress is high, and the bone will start to come apart along the grain forming “checks”. Rules similar to those for drying wood without checking can be applied to bone.
Size matters: Like a large piece of wood, a large bone is more liable to crack than a small one. Small bones will often dry without cracking regardless of how they are dried. If I bury a leg and dig it up a year later, none of the small toe bones will be cracked, but most of the larger leg bones will have checks in them.
Speed matters: Drying things fast causes more stress than drying things slow. That is because when things dry they shrink. As the outside, which is drying faster, shrinks, it has to shrink around the plumper, slower drying interior and cracks are liable to form in the outside. It helps quite a bit that bones are hollow. One way to decrease checking in wood is to bore a hole through the center. But, most bones already have that.
Bone is very dense: Dense materials tend to check more easily than less dense materials. Very heavy dense woods are more liable to cracking in general than light porous woods for instance. So, even though bones generally have the advantage of being hollow, they still have a strong tendency to check if not dried in a controlled way. If a bone was as thick as a tree or as a split piece of wood, I doubt there would be much that you could do to prevent checking, or at least it would take extreme measures.
Control drying: The best way to avoid checking is to control the speed of drying, and there are several ways to do this.
*Humid environment: Drying in a humid environment slows moisture loss, and that’s what it’s all about. If the moisture loss is gradual, moisture from the interior of the bone has time to redistribute throughout the bone, resulting in more even moisture loss, which translates to less stress on the bone’s structure.
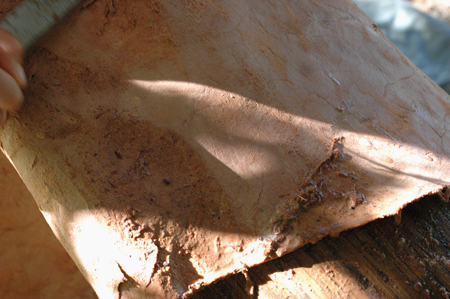
*Slowing drying of the exterior with a coating: Coating the bone with something to slow the drying of the exterior will also allow the whole bone to dry at a more even rate, greatly reducing the likelihood of checking. Using animal fat is easy and effective. Fat can also seep into the bone replacing some of the water.

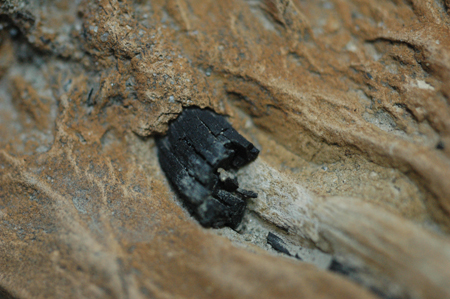
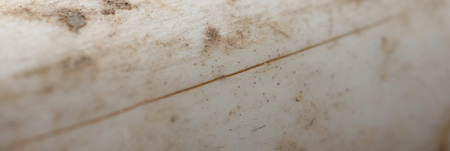
This bone was not oiled, but just dried in the shade. It didn't crack because the oil from inside it, the marrow oil, seeped into the bone, replacing the water. it was also dried in the shade.
*Boiling: I actually don’t know if this works for bone for sure, but boiling wood can reduce checking. I think it works by breaking down the cell structure of the plant allowing water to move from the inside of the wood to the outside. It seems to me that boiled bones have less tendency to check when drying, but that is a very casual observation and one I’m not willing to stand behind. Boiling a bone definitely removes some of the protein material that cements it together, so I don’t recommend long boiling for the most part, since it may weaken the structure, though I suppose it depends on what you are planning to use it for. Further experimentation is definitely needed. I would say that if other methods are used carefully boiling is unnecessary, but could be an alternative and is interesting regardless and who knows if it might be useful someday.
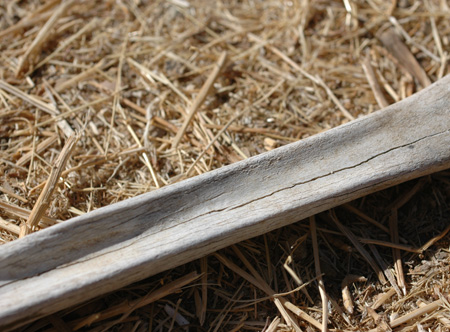
This bone is heavily checked from repeated wetting and drying as well as baking very dry in the sun. Also, there is no oil left in the bone after so much time and weathering. Bone, again like wood, prefers to have a little oil in it.
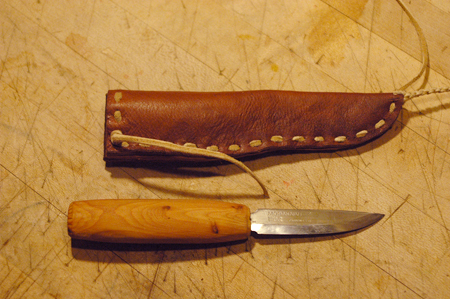
If you only want a small piece of bone, just go out and find one and break it or cut it up. Examine it VERY CLOSELY for any checks if you are about to invest any significant amount of effort into making something nice. I speak from experience :-/ Bones, like wood, have a grain that runs longwise. If the bone is checked and it is cut across the grain, whatever you make might very well fall apart.
If I want a bone completely unchecked for making tools or jewelry or something like that, here is what I usually do and it seems to work very well. Like wood, fresh bone can form checks very quickly in hot dry weather, and I mean within minutes, not hours, so don’t leave them in the sun, and don’t procrastinate too much. Again, this depends on the bone’s character, size, thickness, the weather etc... but just be warned that it can happen very fast. Saw off the ends if you don’t need them. Clean out the marrow with a stick. This allows the interior of the bone to dry along with the outside, which means even moisture loss and less checking. Plenty of marrow oil will usually stay inside the hollow portion of the bone. Scrape the outside of the bone clean with a knife, a stone flake or a piece of broken glass. Oil it heavily, preferably with a heavy tallow type of oil such as that from deer, goat, elk, moose, sheep, antelope or cattle. Put it on really thick.

Deer bone from this year oiled with Deer tallow, which is so thick that it acts almost like a wax, resulting in very slow drying.
If using a lighter oil, like lard, bear, raccoon etc, or if the bone is very large and thick, you may want to put the bones in a plastic bag for extra insurance. Don’t seal the bag. Leave it very slightly open, or poke some holes in it to let moisture escape slowly. This may not be necessary, but is good insurance and easy enough to do. Keep out of the sun or very hot areas, to assure slower drying. I’ve seasoned many bones successfully this way and actually can’t recall any failures. By contrast, bones left lying about will generally form checks unless they are very small or thin. I have a small collection of seasoned bone that I keep around. When I run across a really nice thick walled bone that I might want to use for something later, I’ll season it out as above and store it for eventual use.
It's also good to know that fresh bone is much easier to work that seasoned bone. If you just keep a little oil on the bone and work in the shade, you can make your item out of fresh green bone and then oil it to season out when you're done.
A few of my stash of seasoned bones for making stuff. I wish I had some pictures of all the cool bone stuff I've made over the years, but I don't.
I like to cook intuitively with what happens to be on hand, which means having a certain familiarity with my ingredients. Recipes are just guidelines in my world and not to be taken at face value, ever. I’ve never had enough Saffron around to become familiar with it to the point that I can use it with any confidence. When my mom brought me a small box of quality saffron from Spain, I had a chance to become a little more familiar. With Saffron now on my radar, I of course decided I should grow the stuff instead of buying it. I mean if we can grow the stuff here, why import it at 80.00 an ounce? Saffron seems to be capable of growing in a fairly wide variety of climates from England to Afghanistan. Then I could sell the bulbs and promote the idea of growing it and start a local industry and.....
A laptop surfing safari turned up a few small scale growers focused on high quality Saffron for local consumption, but none of them in California. Aside from these geeky boutique producers who have been bitten by the Saffron bug, saffron production seems to be left to areas where it has long been cultivated.
Saffron’s peculiarly unique flavor is subtle and pervasive at the same time. A few threads too many and it goes from enhancing your dish to ruining it. Fortunately, it’s intensity means that only a few threads are required and if it wasn’t so intense, no one would likely be able to afford to use it at all, nor probably bother to. The part used is the intensely red stigma of a pretty little purple/blue flower named Crocus sativus, the stigma being the female part that receives the pollen. The Latin name is probably pronounced like kroak-us sa-tee’-vus, or sat’-i-vus but no one really knows for sure because Latin is a dead language. So just say it however you want to and if anyone flicks you shit for pronouncing it wrong, just follow Jepson’s advice of The Jepson Manual: Higher Plants of California:
"... practice what sounds good to your ear; conviction is important." "When someone presumes to correct your pronunciation, a knowing smile is an appropriate response."
That's always worked for me :D


